How do I import managers, teachers, student rosters, and demographics?
Learn how to easily upload and integrate comprehensive lists of users, their roles, and their demographic information.
You can complete manual imports for managers, teachers, student rosters, and demographics.
For all other automated nightly imports, please refer to the article “How do I automatically roster with Istation”.
Campus Codes
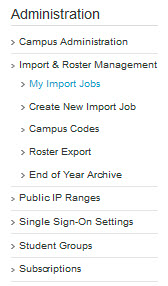
Before processing an import job, you must verify campus codes in Istation. Verifying or entering campus codes can be done by selecting the Administration tab. Next, select Import & Roster Management and Campus Codes from the left menu. If multiple changes are needed at once, a template can be downloaded from the page and then uploaded with the new information.
Delete
 Step-by-Step Instructions to Import
Step 1: Compile Information
Compile a list of students to be imported into the Istation system. This information can be pulled from a school data management system. The template provided is simply a place to start, but others may be used with their own column headers as long as the following required columns are included:
- student’s first and last name
- district-assigned student ID
- district-assigned grade
- teacher’s first and last name
- teacher’s e-mail address
- campus code(s) that uniquely identifies the school where the student is enrolled
NOTE: If the import is part of a statewide implementation, there may be certain other fields that are necessary (i.e., statewide unique ID numbers).
Any row not containing the above-required information will cause a validation error and ultimately will not be imported into Istation.
Additional optional column headers are listed below. More detail about the column headers is listed in the Data Dictionary.
Student/Campus Information:
- student's middle initial
- student's username (must be unique within a school
- student's password
- student's birthday
- teacher's username
- teacher ID (must be unique within a district)
- classroom ID
- class name (default naming conventions are “Classroom - M Smith” for classrooms containing multiple-grade students or “1st Grade - M Smith” for grade-specific classes)
- class period
Demographic Data:
- gender
- race
- ethnicity
- special education
- classroom instruction (type)
- economically disadvantaged
-
English proficiency
- Native English Speaker
- English Language Learner (ELL)
- Former ELL
- disability condition
- gifted and talented
- homeless
- migrant
- native language
Step 2: Save CSV File
After the file is compiled, save it as a CSV file by following these steps:
Step 2a: Choose Save As
Step 2b: Select the location to save the file
Step 2c: Choose CSV from the drop-down menu under the typed name of the file
When you open a CSV-formatted Excel spreadsheet containing leading zeros, Excel automatically removes those leading zeros. Before saving over the original CSV file, please ensure the leading zeros are still intact. If you are unsure how to do so, perform a web search on “Keeping leading zeros and large numbers in Excel.”
DeleteStep 3: Log On
Logging in to the Report and Management website to import student and teacher data is necessary. Ensure that the domain matches the one provided in the welcome email from Istation.
For assistance, please contact Istation Support Services.
DeleteStep 4: Create an Import Job
Step 4a: Select the Administration tab at the top of the page.
Step 4b: Select Import & Roster Management and Create New Import Job from the menu.
Step 5: Select Import Job Type
- 1file: This imports students, teachers, and classroom data. This data must come from a single file.
- teachers: This is for importing teacher and manager accounts. Teacher accounts must be created in order for teachers to log in to the customer website and to create classrooms for teachers.
- demog: This imports student demographic information to existing student accounts.
- OneRoster v1.0: This imports CSV tables formatted to IMS Global OneRoster v1.0 standard.
- OneRoster v1.1: This imports CSV tables formatted to IMS Global OneRoster v1.1 standard.
Step 6: Import Settings
There are several settings associated with an import job.
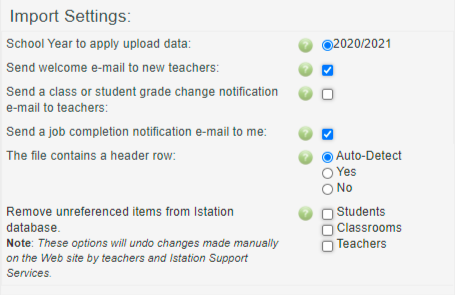
- School year to apply upload data: This will generally default to the current semester, and occasionally more than one semester may be available. In addition to the current school year, a summer school option is available within 100 days before the start of the next school year. The next school year is not available. Do not import for the next semester until after Istation usage is complete for the current semester. Students who change schools for the new semester will be unable to access Istation from their previous school.
- Send welcome email to new teachers: This will send an email to new teachers with a temporary password when the import creates their account.
- Send a class change notification email to teachers: This will notify teachers that students have been added or removed from their classroom.
- Send a job completion notification email to me: A confirmation email will be sent to the email address on your profile once the submitted job is complete.
- Remove unreferenced items from Istation database: These options are used to ensure that enrollment in Istation mirrors records in a district’s student information system. As such, students, classrooms, and/or teachers added manually at a campus may be removed. Use these options with caution. Typically this affects EL and special education classes that are manually created if they are not in the district import file.
- Students: Checking this box will remove any existing accounts for students who are not included in any classrooms in the import file from the system. Those students may be re-added to a classroom in any school in the district, and all original student data is retained.
- Classrooms: Checking this box will remove any existing classrooms that are not included in the import file. Students in these classes who do not appear anywhere else within the district will be removed from view.
- Teachers: Checking this box will remove any existing accounts for teachers who are not included in any classrooms in their school, and their accounts will be deactivated. This option alone does not affect classrooms or students.
Though each case is different, and we are happy to discuss your particular situation, the typical recommendation is to check the Teachers box for the first import of the year to clean the campus data and then do not select it throughout the year to prevent EL and special education teachers from being removed. You can also check the Students box to keep your data clean from incorrect information.
Import Job Actions
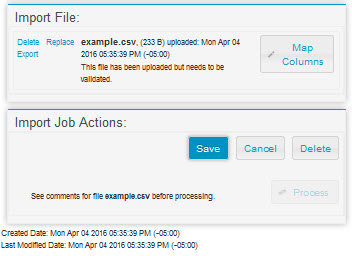
- Replace: Remove the current import file and replace it with a different file.
- Export: Download the currently imported file to review.
- Save: Save import job at any time and return to edit at a later date if needed.
- Cancel: Cancel any updates you have made since the last save.
- Delete: Delete the entire import job.
- Process: Complete the actual import of data from your CSV file to the Istation database. This can only be selected after the column mapping process has been completed.
You will receive a confirmation of submission.
Created Date and Last Modified Date for the import job are also available on this page.
Step 7: Map Columns
From the drop-down options in the middle of the screen, select the column header in the file that matches the options in Istation.
Mapping columns is the process of matching data column headers between Istation and <your_school>.CSV data models. The Map Columns web page has three columns: Istation Names, Import File Column Headers, and Import File CSV Examples.
Required fields are indicated with a red asterisk (*). For optional fields, select the blank option in the drop-down box if you do not wish to specify a value. A value will be assigned automatically, using the Istation default format, if the following fields are left blank: Student User name, Student Password, Teacher User name. Refer to the Data Dictionary for more information about the fields.
To check the validity of the data submitted before processing, click the Validate button. You will be provided a list of validation errors if any, and provided the next steps for the process.
DeleteStep 8: Validate File
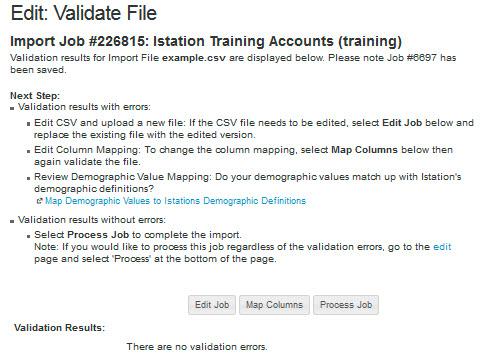
On the Validate File page, there might be validation errors if the file is missing data or has data in an incorrect format. The validation results will inform the user of errors and the line number in the file where they occurred.
The following example was missing an email address for a teacher on line 2, and had an incorrect ID format on line 4.
Possible errors include the following:
- missing a required column
- unknown campus ID
- invalid grade
- invalid email address
- invalid student ID
- invalid date format
- various demographic errors

- At this point, there are several options:
- If validation errors occur because of file issues, edit the job by clicking Edit Job to import a new file.
- If validation errors occur because of column mapping issues, re-map the columns by clicking Map Columns.
- If validation errors occur but the import should be processed anyway, ignoring those lines, click Edit Job and then Process Job (If it is completed, the import will skip the students with missing data)
- If there are no validation errors, click Process Job to continue
Step 9: Process Job
To complete an import, click the Process Job button. The screen will display the job number.
The status of jobs can be found under the My Import Jobs option on the left side of the screen.
When the job is completed, it will be listed on the Completed Jobs tab, and an email notification will be sent if that option is selected. Additionally, updates will be apparent when viewing a campus's classrooms.
Completed/Processed Import Jobs
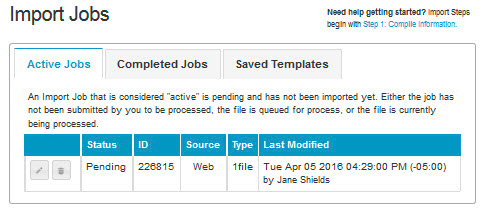
The status of import jobs can be monitored on the Import Jobs web page
The Active Jobs tab lists jobs that are either pending, queued, or currently being processed.
The Completed Jobs tab lists jobs that have been processed. Click the View button to see a completed import job’s results.

The following information is available on the View Import Job page:
- import job results – lists details from the import (how many students or teachers were added/removed, etc.)
- import file details
- column mapping information through the View Column Mapping button
- import settings
- option to save import as a template through the Save as Import Template button
Saved Templates
The Saved Templates tab lists any saved templates used for processing FTP Import jobs.
SFTP/FTPS Settings
View the FTP Imports article for information on setting FTP connection using the SFTP protocol.
If you have any questions about this information, please contact our support team at: support@istation.com or 866-883-7323, option 2.